
Dive into the H2O-inspired trend making a splash in the world of nail art: water nails! If you’ve ever found yourself fascinated by the shimmering sunlight dancing on the water’s surface by the poolside, get ready to bring that mesmerising effect to your fingertips.
Water nails have taken the internet by storm, flooding TikTok with over 15.5 million views under the hashtag #waternails. Whether you’re in your mermaidcore era or simply seeking nail inspiration, this trend is sure to make waves and leave you longing for a beachy summer getaway.
What Exactly Are Water Nails?
Water nails encompass designs that channel the essence of the ocean, pool, or any other water-related elements. While the classic interpretation resembles the play of light on water, the trend has expanded to include textured droplets, 3D motifs, and more. The key to nailing this trend is to stick to a colour scheme reminiscent of water, typically utilising shades of sheer blue and white polish. To add a personalised touch, you can incorporate ocean-themed stickers or seashell charms that make your manicure stand out from the crowd.
How to Get Water Nails
While achieving water-effect nails at home is possible, the process can be a bit time-consuming. It’s advisable to visit a professional nail artist if you want to fully immerse yourself in this trend. However, if you’re feeling adventurous and want to give it a try, here are a few tips to get you started.
Start by applying a sheer blue polish as your base colour. You can mix an existing blue polish with a clear topcoat to achieve the desired shade. Next, apply a layer of sheer white polish over the cured blue base. Without curing the white layer, dot a clear topcoat on top to disperse the colour, creating a surface that resembles the sparkling surface of water. Seal it all off with a shiny topcoat, and voila! You’ll have the water nails of your dreams.
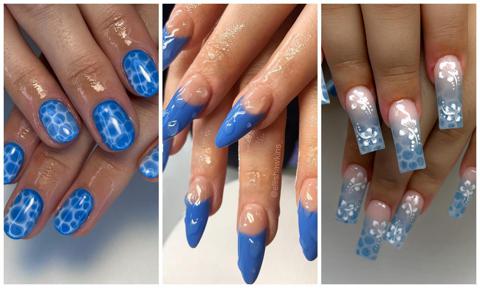
Pool Water Nails: A Refreshing Dive
If you want to create the illusion of translucent water, opt for a gel lacquer to achieve a realistic effect. Start with a base jelly coat in a semi-transparent aqua shade. You can also experiment with glassy white or glimmering silver for added dazzle.
After applying your sheer base coat, mix blooming gel with white gel colour in a one-to-one ratio and apply it on top of your base colour. Before curing, add small drops of clear blooming gel over the wet layer to reinforce the rippled water effect. Cure the entire nail and finish with a topcoat for a glossy shine.
For a fun twist, you can also add a pool tile effect using a nail dotting tool. Dip the tool in a clear topcoat and stamp little dots all over the nail. Allow the droplets to spread for a few seconds before curing, creating a delightful square effect. To elevate your manicure further, consider adding delicate nail art, like daisies, in a contrasting colour.
Water Drop Nails: Taking It to the Next Level
Take your water nails to another dimension by adding graphic water droplets. Start with a base colour of your choice (jelly polish works great here) and let it dry. Then, use builder gel or decorative nail droplets to form droplets on the nail’s surface.
Dip a dotting tool into the builder gel or stick the decorative droplets onto the finished nail design like stickers. Seal everything with a topcoat, and within minutes, you’ll have a manicure that’s guaranteed to make waves—whether you’re lounging by the pool or anywhere else.
So, get ready to make a splash with water nails! This trend is sure to tickle your fancy and add a touch of whimsy to your summer style.
- Quick links
- Nail Trends
- nail polish
- nail art
- beauty trends


